New Release: Custom Notification Centre, Analytics and More
Dec 29, 2019
How often are you engaging your customers after they checkout? Do you know when you should send notifications, and are you personalizing your messages to your customer?
Personalized communication has become crucial to the customer journey and is now a key predictor of brand loyalty and customer retention in e-commerce.
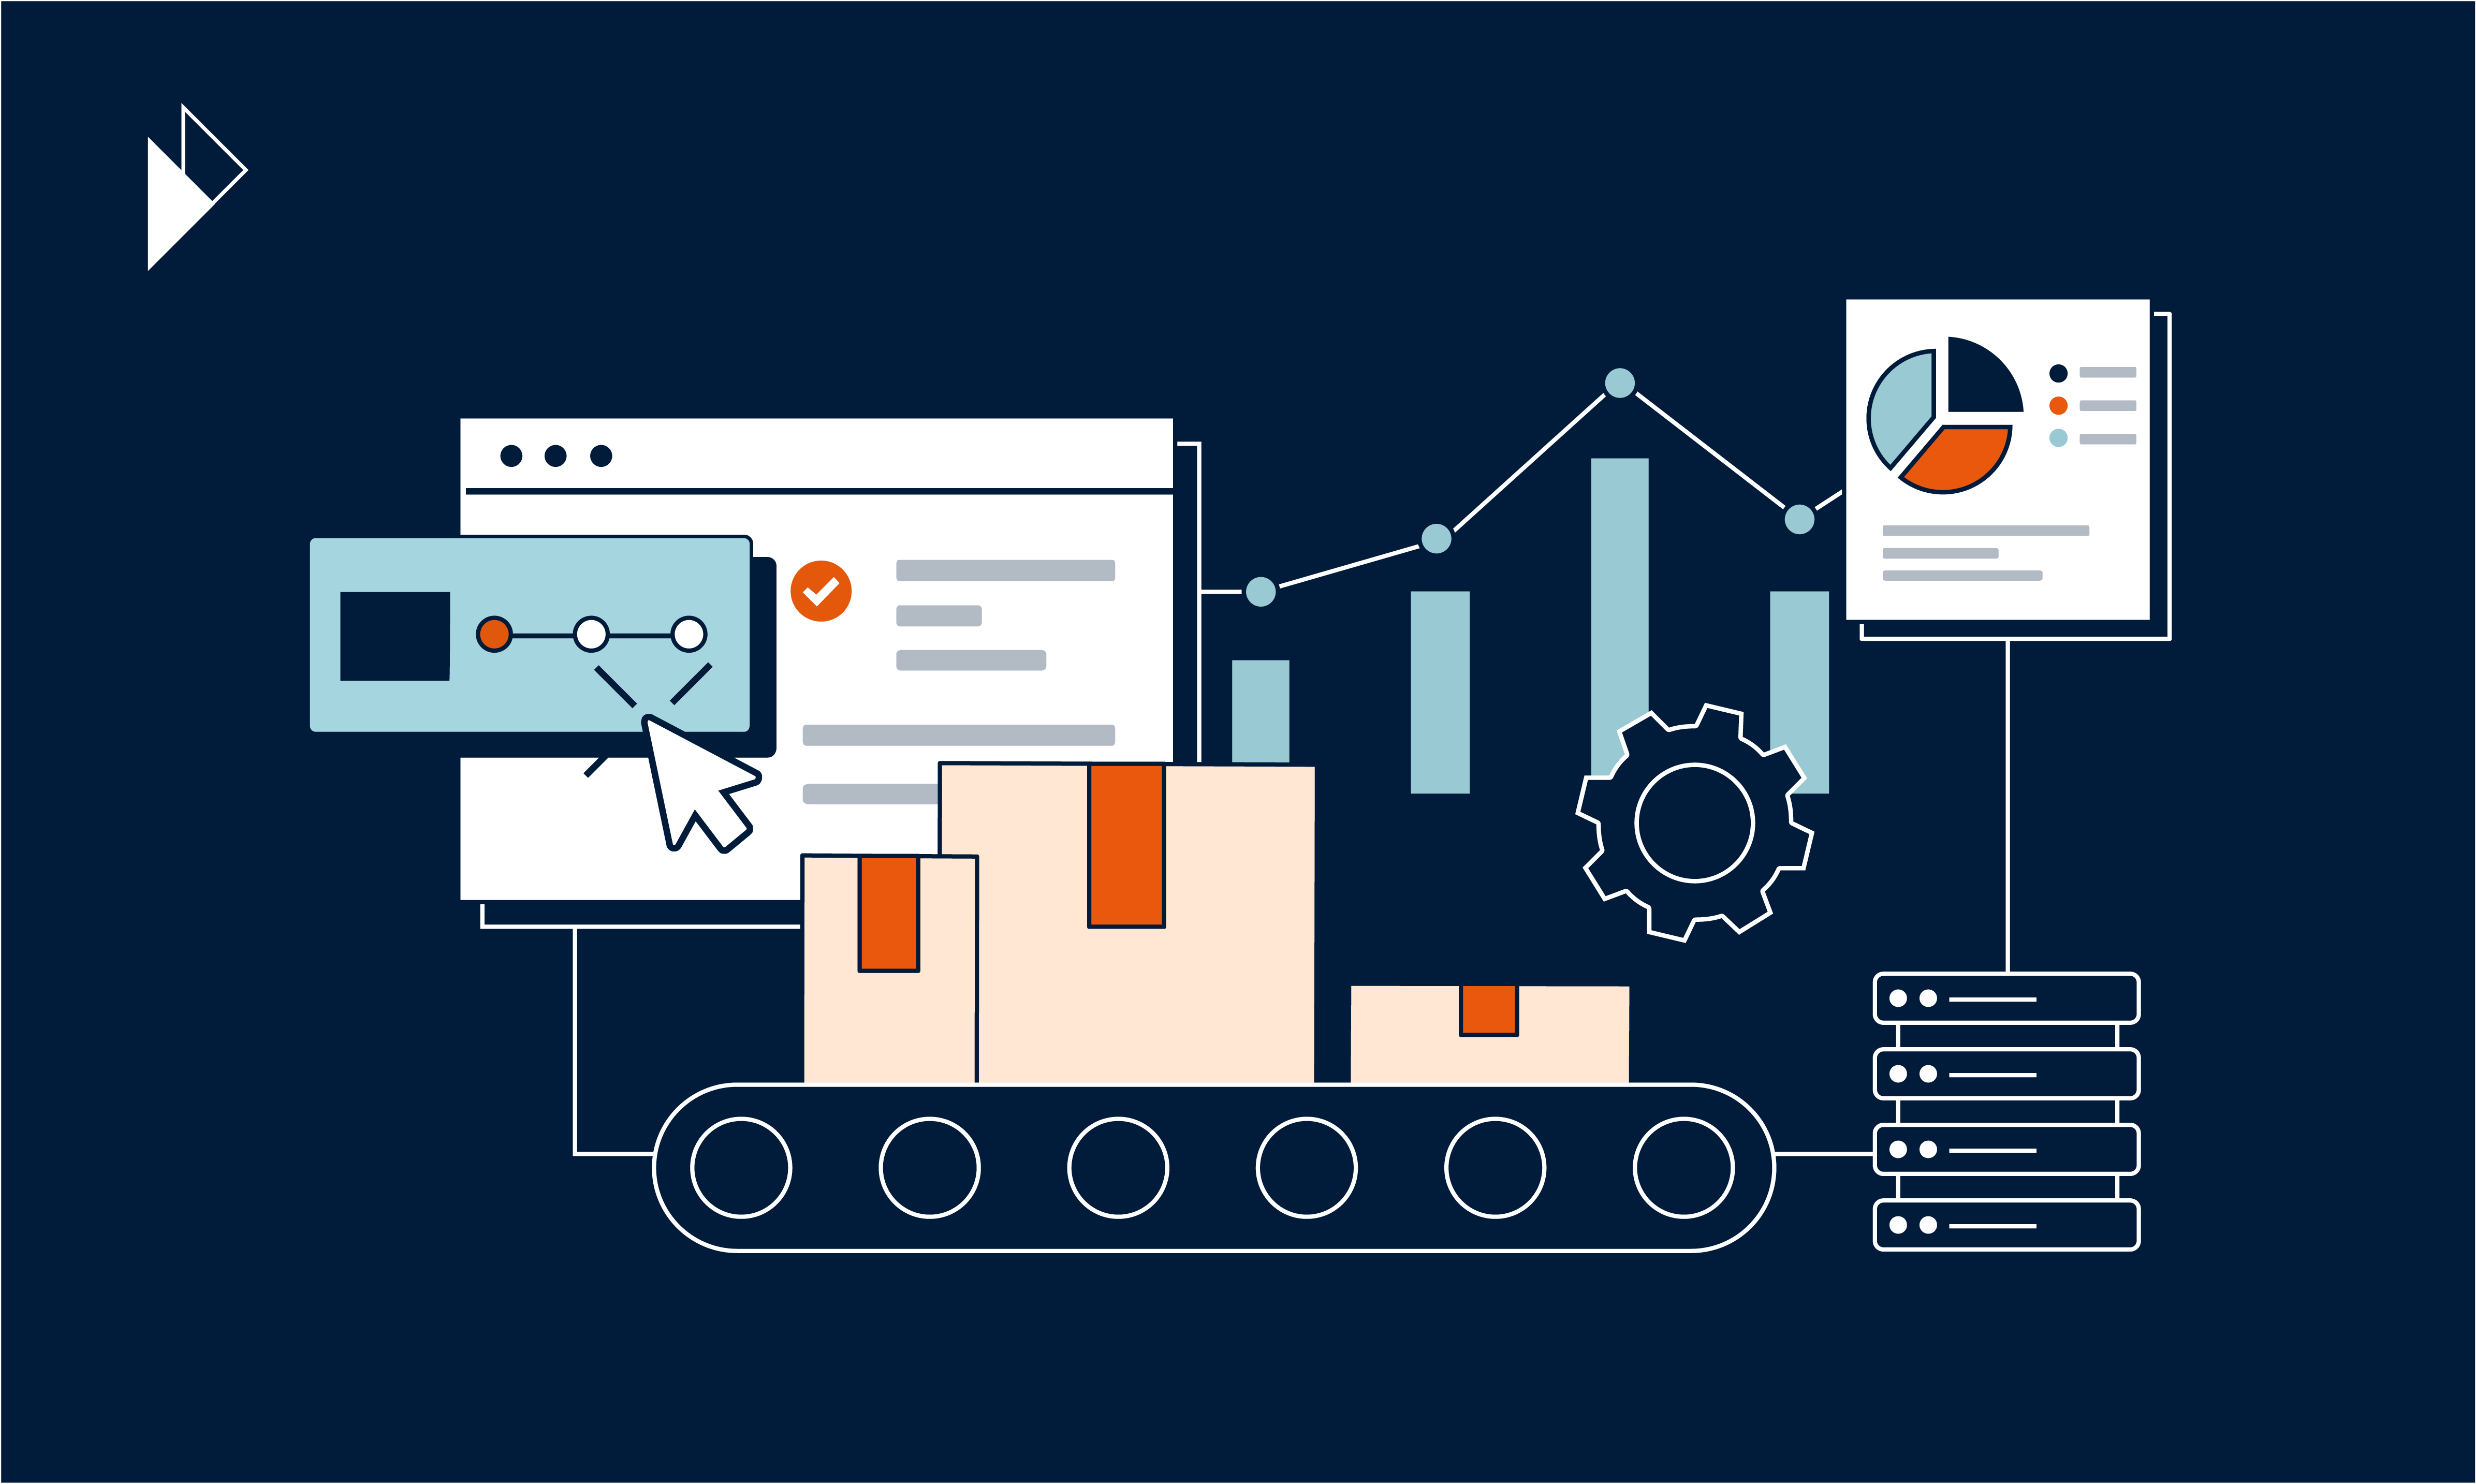
To help you deliver and perhaps even surpass these expectations, we’re excited to unveil one of our most comprehensive updates to our platform: a customized notification centre to give you full flexibility to engage your customers the way they expect!
Who is this update for?
Account Administrators with the Tracking Experience user role
Marketing Managers
E-Commerce Managers
Customer Service Managers
What’s new in this update:
An all-new platform addition; Notification Centre offering unparalleled flexibility to configure customised notifications and targeted campaigns based on specific tracking experiences, carriers or tags in your account
Drill-down on the performance of your notifications and identify areas of improvement or what’s resonating with your customers.
One central location in the app to manage all your notifications including webhook configurations and
. You’ll only need to use the Integrations page once to provide us with the webhook endpoint, after which all notifications is configured through the Notification Centre.
Our Email Editor and the Update section that belonged to the Tracking Experience tab in the platform UI has now been shifted to the Notification Centre.
The possibilities for segmentation, and personalised targeting are endless!
For instance, create a notification that only applies to selected carriers in a specific country if you want to run a geo-targeted campaign.
Create a specific series of personalised notifications that only applies to a
Tracking Experience
created for a limited-time holiday sale. Perhaps define a
Tracking Experience
for your exclusive VIP customers?
Alternatively, if you’ve got parcels that previously experienced a delivery delay, flag them for priority follow up with parcel tags and run a customised series of notifications differing in copy and brand design.
We’re confident this update will help you deliver extraordinary customer experience for your customers. Get up and running with our notification centre creating specific notifications that echo your brand, look amazing and feel confident about the content that you’re creating for your customers.
Let’s take you through what is possible with our new Notification Centre in this article.
Accessing the notification centre from the Dashboard:
Users with Tracking Experience or Administrator roles will view and access the new Notification Centre icon from your Dashboard.
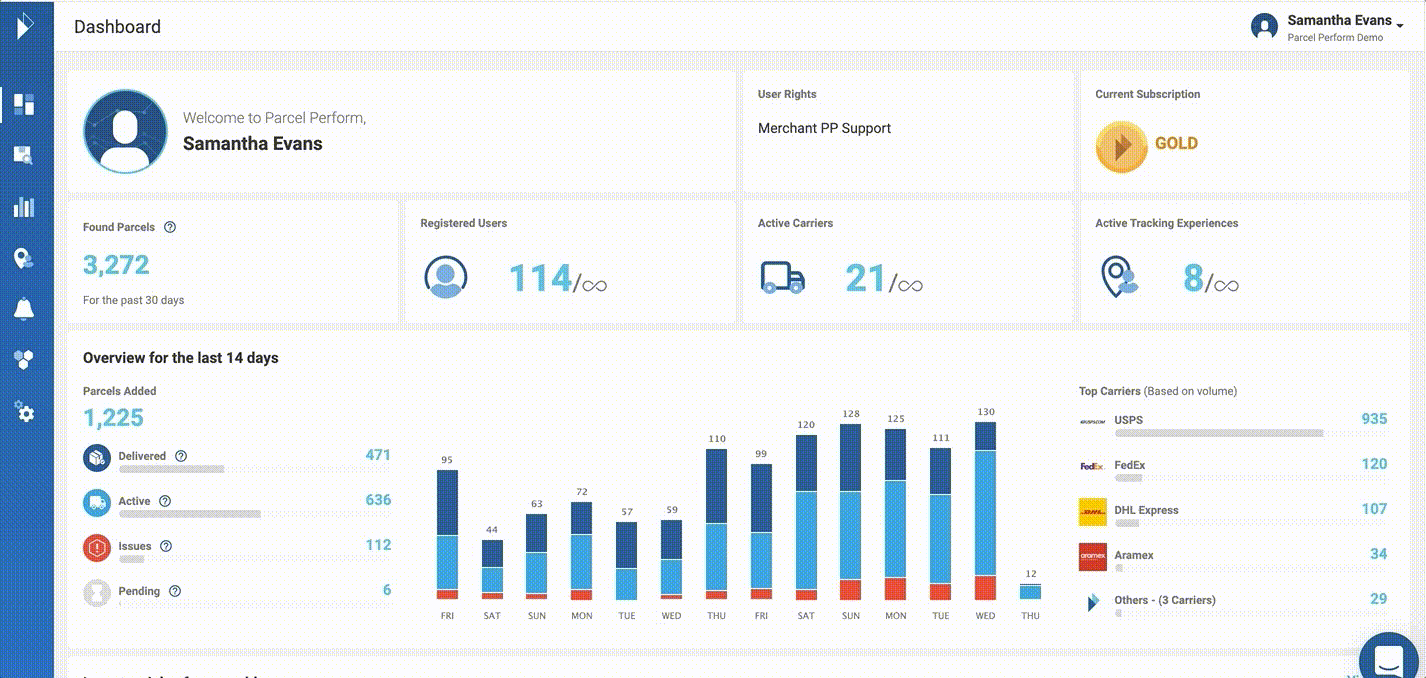
The Notification Centre dashboard offers the following
Performance data of your email notifications sent over the last 14 days including open rate, click rate, bounce rates and unsubscribe rates.
Button to quickly create a new notification to your account
A summary of all notifications in your organization’s account
A step-by-step guide to create and activate a new email notification from the Notification Centre
Step 1: Click on the Add Notification button from your Parcel Perform Dashboard and select the channel you’re creating this notification for. Three channels are available with this new update - email, webhook notifications and SMS.
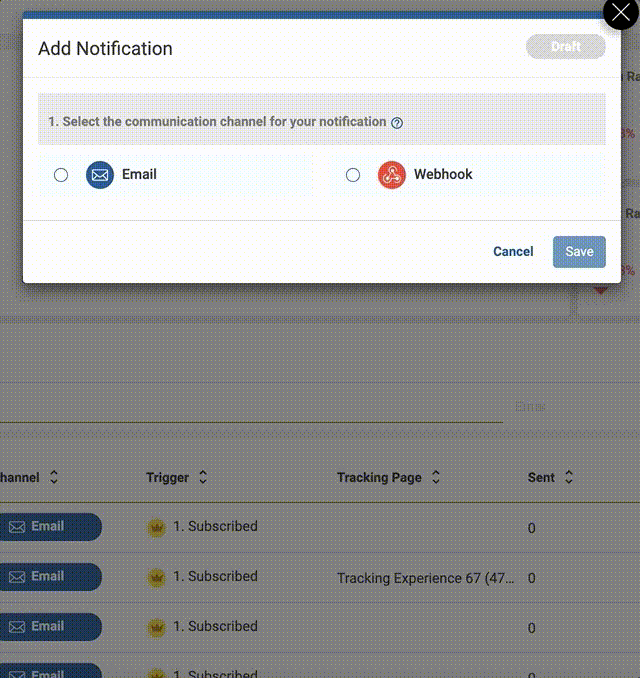
All channels will have the same nine standard triggers you know and love. Use webhook notifications to create customised triggers for your organization’s specific needs.
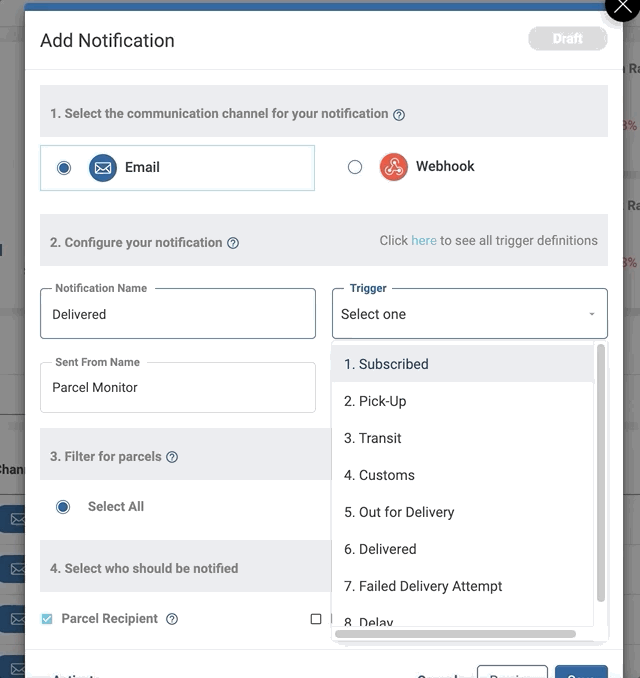
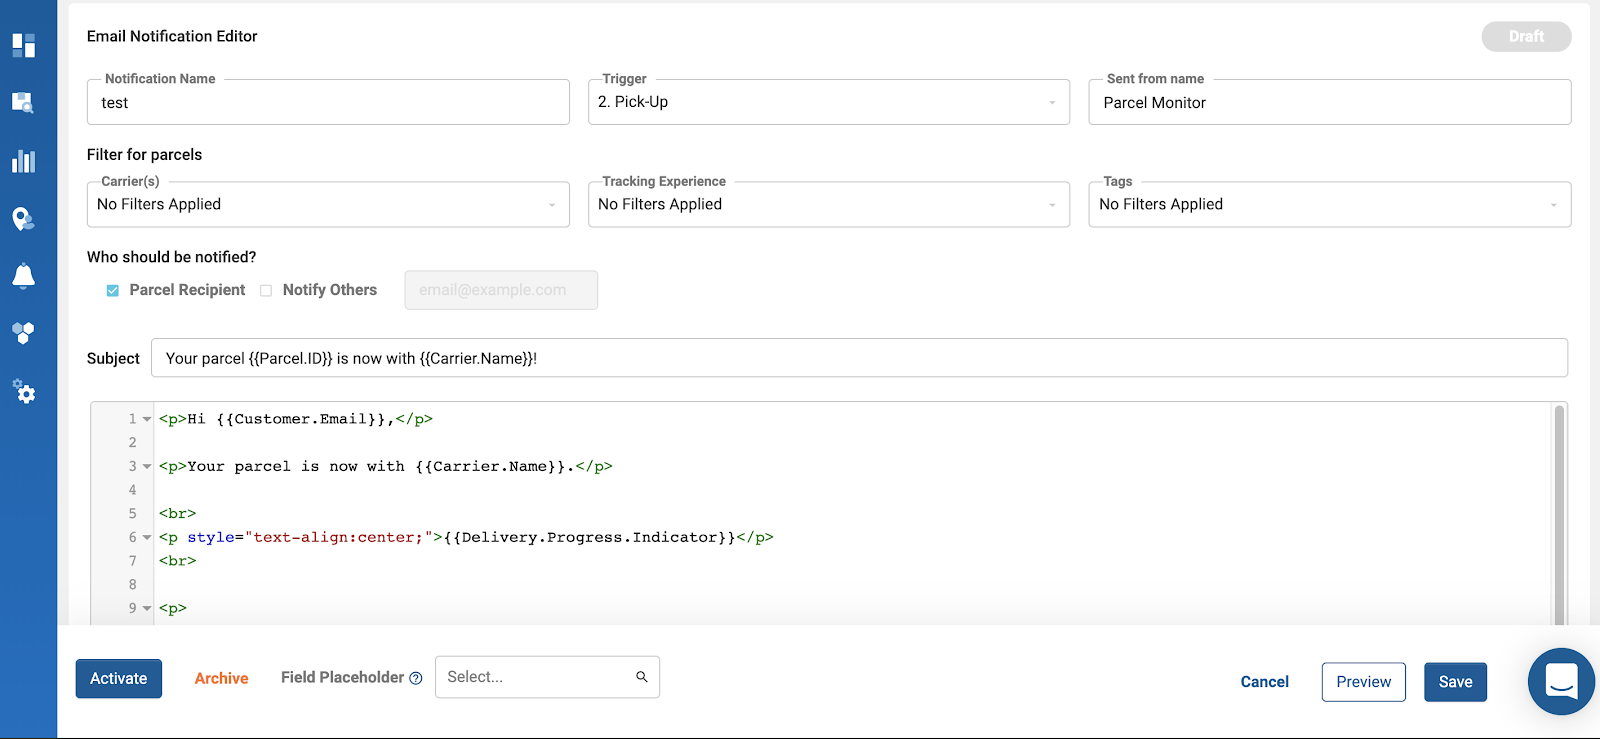
Step 2: Name your new notification
Step 3: Select the trigger that will activate the new notification you are now creating.
When selected, your customers will receive a notification with your tracking results when their parcel reaches each respective trigger milestone.
Each user will have access to our standard nine triggers which cover the breadth of a typical delivery journey after checkout.
For a full overview of all available triggers in the platform, click here.
Note: All notifications will also have access to a unique trigger ‘All Events’. This trigger will send a notification for all events that occur for a specific parcel. For example, you can connect a webhook notification to customer service communication software like Zendesk or Slack to keep your team up to date on parcels from a specific marketing campaign or carrier.
Step 4: Define your notifications Sent-from name to reflect your shop’s name and branding. Otherwise, the notification will keep the default Sent-from name ‘Parcel Monitor’.
Note: Interested to change the Sent-From Email that’s displayed on your emails? We can do that for you, contact your account manager for more details.
Step 5: Select the HTML email template that will be used in your email. We’ve got standard Parcel Perform templates for each notification to get you started in seconds. Otherwise, you can also build your own custom templates using HTML or load in your own email templates which you can configure in the next page.
Step 6: Now it’s time to apply the notification to your parcels. By default, the Select All option will be applied, meaning that your new notification will apply to all available parcels in your account.
However, if you only want to select specific parcels, we've got you covered. Selecting the "Filter By" radio button enables you to filter your parcels for specific segments based on the available filter criteria.
Step 7: Select who the notification should be sent to:
Besides sending the notification to the parcel recipient (the email address that’s been uploaded with the parcel), you’ll be able to notify another recipient when the notification is triggered after activation.
Simply provide a valid email address in the text box. Multiple email addresses can also be informed simultaneously, simply separate each email address with a comma.
When would this be useful?
If you’ve got a priority shipment to monitor, why not configure your notifications to automatically forward to your customer service team member in charge so he/she is always kept up to date.
Step 8: You’re all set! Now you’ve got a few options to manage your new notification.
Preview sends a preview of the notification to your email account so you can check how it displays on your email client and different browsers before activating the new notification.
Note: Preview triggers the notification to the email address linked with the Parcel Perform account used to create the notification.
Once you’re happy with your created notification, select Activate and all future parcels that meet your selected requirements will be sent your newly-configured notification.
Managing your notifications:
You can also choose to Archive notifications in Draft or Deactivated mode. Once a notification is Archived, it will not appear in your account.
Otherwise, use Save or Next to save the notification in draft status if you want to activate it later.
UPDATE: How to configure a webhook notification.
We’re updating webhook-based notifications for even more flexibility when deciding on your notification sequencing or strategy.
Setting this up is simple. First, set up the webhook integration within the Parcel Perform platform by entering your webhook endpoint URL in the Integrations menu and saving.
Note: Administrator access is needed to view and edit your account integrations
Once done, you will be prompted to continue on to the notification centre.
UPDATE: SMS notifications are now available within the platform
A complete walkthrough on how to create and use SMS notifications can be found here.
Your potential notification questions, answered!
How do I avoid creating duplicate notifications across my campaigns?
We’ve got you covered! You will be prompted when we detect more than a single notification that uses the same channel, trigger, carrier and tracking page.
If you see this prompt, quickly go through your previous configured notifications in your Dashboard to identify the duplicate and you’ll be all set!
How do I edit my existing notifications?
If your notification is still in draft mode: Here, all configurations steps can be edited.
If your notification is already active: Deactivate the active notification first and you’ll be able to edit everything except the notification’s channel and trigger to ensure the accuracy of your user engagement metrics.
How do I create a custom email notification template?
If you’ve selected a custom template while configuring your notification, the Next button takes you to the email editor.
Customise the subject line and email body with HTML content to fit your own requirements! For instance, plug in your own HTML templates to apply your company’s branding to your email design and layout.
You can also use our extensive list of Field Placeholders in both the email body and subject line to add more personalisation to your post-purchase email communication.
For example, automatically pull in each customer’s name, parcel information, company name in your emails to make your customers feel that the message was customized just for them - your customers will love the personal touch.
Up your e-commerce game with personalised, timely delivery notifications.
With the plethora of convenient shopping options available online, your customers will naturally gravitate towards the retailers who can offer the best customer experience.
We’re confident that with our new Notification Centre you can create a personalised post-purchase delivery experience that will keep your customers coming back beyond this shopping season. All these would not have been possible without the support of Amazon Web Services (AWS) which powers this new, powerful capability. Join international retailers like Expondo who use our Notifications feature to enhance their post-purchase experience for their customers around the world.
The Notification Centre is now available to Parcel Perform account Administrators and users with the Tracking Experience user roles. Any ideas, questions or feedback? Connect with us on LinkedIn or speak to your account managers for more details.
You might also like
E-commerce returns analytics: Extracting insights for business growth
Learn how to extract and interpret relevant data to improve the returns experience.
Jun 13, 2023